Pixlr Tutorial - Collages
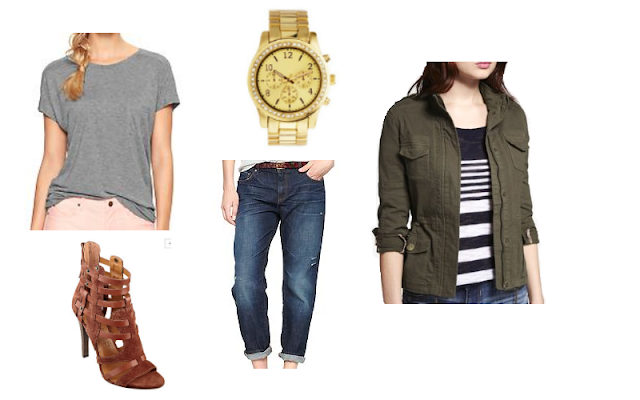
8:00 AMHi everyone! If you caught my post on Friday, you'll remember I am now crazy about Pixlr Editor. Its great to make collages and to edit pictures, for FREE! If you don't want to throw down a couple hundred dollars on Photoshop, then this program is for you! Today, I'm going to show you how I made the above collage. If you like posting outfit combinations or have odd size photos you'd like to merge together, this tutorial will hopefully help!
1. I decided upon the outfit in my mind: boyfriend jeans, a grey t-shirt, conac caged heels, leather jacket and a watch. I then searched for those pieces through my favorite retailer's websites.
2. When I find one of my pieces I immediately add the link to my post of where I found the piece by using the link button in the posting window.
3. Once you find your first image online you need to use A) The snipping tool if you're a PC girl [find this by going to your start menu and type in snipping tool] or B) Contol + Shift + 4 if you're a MAC girl. I found my grey t-shirt on gap.com...
now I pull out my snipping tool and make sure it is set to rectangular snip
move the box around where I want to snip(I had to take a picture of what this looks like since I can't snip a snip haha)
and now I can save my snip. I'll call this grey t-shirt (creative I know). Save this as a png, so you'll have a transparent background that will blend in
4. Repeat this will all of your images for your collage (paste the link into your post, snip and save as png)
5. Open this link: http://pixlr.com/editor/ and click on "create a new image"
6. Name your new image and set your proportions, I think a good place to start is 1000 width X 600 height, you can always make the canvas smaller or larger if you need to...
7. You should now have an empty white background to work with. Go to file then open image
Choose whatever you save your first picture as. It will open in a new window.
8. Using the lasso tool, lasso up what you want to copy into your collage
9. Go to edit then copy. Then click back over to your collage and go to edit then paste. You'll now have your image on collage. Use the arrow on the top right of tools to move your image around the collage (if the image is not the correct size go back to original image, for me that would be the shirt, go to image then image size and try different sizes to get the correct one)
10. Once your image is copied in to the canvas, exit out of the original image and repeat the process for the rest of your images.
11. If you need to move your images around initially placing them, simply click on the correct layer on the far right before moving them about the collage.
12. File then Save (again save as a png so it blends into your white blog background)
Bam! A personalized collage!
I know this tutorial was rather lengthy, but once you know the steps, collages are easy. Making a collage this way works best if all of your images have pure white backgrounds. Next week I'll be sharing how to use images that aren't all white backgrounds... how to crop perfectly using pixlr.
Shout out in the comments if you need any help at all!
XOXO Taylor


1 comments